There is an amazing Sew A Long that will start next month over on Sew Sweetness.
Thursday, April 18, 2013
Tuesday, April 2, 2013
A Gift and a Tutorial All in One!
Last year while living in TX and working at Western Hills Elementary school, one of my dear friends was diagnosed with Stage 3 Ovarian Cancer. I knew that she would be doing a lot of going back and forth to the hospital, I knew that she would need a bag to carry everything in. I scouted around online and found some pretty teal ribbon fabric along with some pretty sparkly butterfly fabric from the same line. I made her this bag.
The next thing you are going to do is line up the bottom edges of the front and back covers, right sides together.
The draw a line 1/2 in in from the edge across the whole length of the bottom edge.
Now you will sew along the line you made 1/2 in. in from the bottom. You will sew the first inch with a regular stitch, making sure to back-stitch at the beginning and end of the one inch. When you get past the one inch mark, increase your stitch length to as high as it will go to make a basting stitch.
It should look something like this. I am using a more contrasting thread but you can also use something that blends in. No one will see this part of it anyways.
Now you are going to iron the seam open. See how it sticks up? (Please excuse messy desk in the background!)
Press open the seam so that both sides lay flat and open.
I like to open the zipper a little so that I know it is inside the area it needs to be. This also helps you to be able to sew the ends down well.
Once I get down to the opposite end as the zipper, I like to flip it over and clip the threads right on top of the zipper so that I can move the zipper further down and out of the way when I get to the area that I started.
This is also the time to cut any over hang you have on your zipper ends.
Before sewing your pillow closed on the other 3 edges, be sure to open the zipper at least half way!!!! This is very important. It is quite a pain to not open the zipper.....trust me, I have been there!
Sew them together, turn inside out, and stuff with whatever you desire!!!
Doesn't this look nice?!!
The handle was long to swing around and there was a pocket on the inside. Another friend of hers (who I had never met) made her a blanket from the same exact fabric!
Not too long ago I heard the news that after a non-cancer related surgery it was found that the cancer was back and had spread. This was very heartbreaking for all of us but I know that if anyone can fight it off a second time it would be her!!
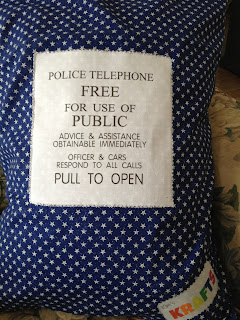
I knew that I had to make her something else so I racked my brain and talked to her wonderful British husband and he suggested a pillow. Of Course!! I also knew that she liked British shows like me and I just happened to have a Tardis pattern that I had been dying to try. The Tardis is the space ship from Dr.Who which is one of the best shows ever!!
At the same time, I also needed to write a tutorial for the upcoming Craft Market that I am in....
be sure to mark your calendars for this!!
So my tutorial will be for adding a zipper to a pillow cover. I know that a lot of people are afraid of zippers and prefer to do an envelope type cover but I like the zipper....little boys are tempted to stick their hands and stuff in the envelope pillows!
The first thing you need to do is finish the front and back of the pillow. Size is totally up to you and what you are making. Mine are a finished size of 18 in by 24 in. I accidently got a 24 in zipper instead of a 18 in one but longer is always better than shorter.
The draw a line 1/2 in in from the edge across the whole length of the bottom edge.
Then draw a line one inch in from each side.
Now you are going to iron the seam open. See how it sticks up? (Please excuse messy desk in the background!)
Press open the seam so that both sides lay flat and open.
Now you are going to lay your zipper face down along the crease where the 2 pieces connect.
I like to open the zipper a little so that I know it is inside the area it needs to be. This also helps you to be able to sew the ends down well.
Then pin the zipper down along the length of it so it doesn't move. You may also mark a 1/2 inch in from the edges on the zipper so that you know where you started basting.
Then it is time to put your zipper foot on your machine and start sewing around the zipper. I like to do extra back stitching at the ends to make it more sturdy.
Once I get down to the opposite end as the zipper, I like to flip it over and clip the threads right on top of the zipper so that I can move the zipper further down and out of the way when I get to the area that I started.
Here is what is should look like on the front after you have sewn around the zipper! Now remember how I clipped the threads over the zipper pull? Now is the time to clip the rest of the basting stitches and pull the little threads out! (I really hate this part)
Sew them together, turn inside out, and stuff with whatever you desire!!!
Doesn't this look nice?!!
As I mentioned, I made this pillow as a comfy pillow. Instead of using a pillow-form, I made my own pillow for the inside. I got some Micro Beads to give it some weight and them I stuffed the rest with Pellon Perfect Loft to give it some comfiness!
Lesli received the pillow and loved it! I hope to be able to add picture of her and the pillow soon!
You can read more about her and her amazing journey here.
Let me know if you try out my pillow zipper and if you have any questions!!
~Kim
Lesli received the pillow and loved it! I hope to be able to add picture of her and the pillow soon!
You can read more about her and her amazing journey here.
Let me know if you try out my pillow zipper and if you have any questions!!
~Kim
Hi, my name is Kim and I am a pinner.....
Are you on Pintrest? Everyone should be! I just wanted to take a minute to share a couple things I have tried from there.
BTW- this post is dedication to another fabulous Kim out there. She is wonderful and we post the same things!
I made this is didn't really like it. The apples didn't cook all the way thru and it wasn't the same as a pie!
http://domesticdilettante.com/2012/01/11/applepie/
I made these and they were WONDERFUL and soo easy!!
http://recipenewz.com/recipe/Oven-Baked-Meatball-Sandwiches-201208301456/
Another fabulous quick and easy meal!
http://www.whatscookingwithruthie.com/2011/09/02/french-bread-pizza-done-right/
With living in TX for 3 years, I got addicted to sweet tea and this recipe is THE BEST out there to make your own!
http://cravingcomfort.blogspot.com/2012/07/sweet-tea.html
I made this for Christmas morning breakfast. Very dissappointed. It didn't cook evenly and it all stuck to the bottom of the pan. Has to be an easier way!!
http://sheldonrachel.blogspot.com/2009/03/french-toast-bake.html
I am sorry there aren't pictures of what I made- I never think to take pictures before we dig into them!
Hope you like my suggestions and I would love to know what you love on Pintrest!
~Kim
BTW- this post is dedication to another fabulous Kim out there. She is wonderful and we post the same things!
For cleaning:
Vinegar is AMAZING!! Use it on anything and it will clean it and make it shiny!!
http://frugallysustainable.com/2011/11/explosive-showerhead-cleaner/
I also did this to my oven and it worked amazingly!!
http://www.thecouponersswagger.com/2012/12/27/how-to-clean-your-oven-after-the-holidays/
I also did this to my oven and it worked amazingly!!
http://www.thecouponersswagger.com/2012/12/27/how-to-clean-your-oven-after-the-holidays/
For kids organizing for school:
Have too many papers hanging around and flowing out of backpacks? I made one of these and you can too!!
Then there is food.....!!!!
I made this and it was fabulous! I think it would be even better with bacon in it!!
I made this is didn't really like it. The apples didn't cook all the way thru and it wasn't the same as a pie!
http://domesticdilettante.com/2012/01/11/applepie/
I made these and they were WONDERFUL and soo easy!!
http://recipenewz.com/recipe/Oven-Baked-Meatball-Sandwiches-201208301456/
Another fabulous quick and easy meal!
http://www.whatscookingwithruthie.com/2011/09/02/french-bread-pizza-done-right/
With living in TX for 3 years, I got addicted to sweet tea and this recipe is THE BEST out there to make your own!
http://cravingcomfort.blogspot.com/2012/07/sweet-tea.html
I made this for Christmas morning breakfast. Very dissappointed. It didn't cook evenly and it all stuck to the bottom of the pan. Has to be an easier way!!
http://sheldonrachel.blogspot.com/2009/03/french-toast-bake.html
I am sorry there aren't pictures of what I made- I never think to take pictures before we dig into them!
Hope you like my suggestions and I would love to know what you love on Pintrest!
~Kim
Monday, March 11, 2013
My First Quilt Show!!
So my mom came down this weekend and we went to the Bloomington Quilt Show. The reason for going was that I had a quilt that I submitted to be judged. This was also my first time to Bloomington. It is definitely a college town!
As we were driving thru downtown, we noticed that the trees looked a little strange...
Someone told us that this is called yarn-bombing. The trees seem to represent the different shops that surround the center of the city. They really seem to brighten up the town.
This was also painted on the side of a building. Not sure what it represents but it looked cool.
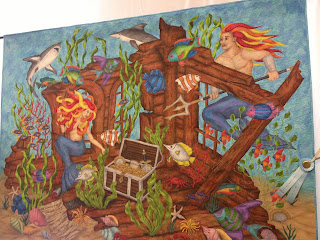
The show was amazing!! I can't imagine all the hours of work that have gone into some of these quilts.
This one was the big winner!!
It was even more amazing in person. The colors just popped!!
Here are a couple fun ones!
This Lady of the Lake is beautiful and I love the quote!
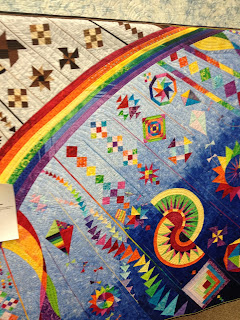
This one is where you take a piece of fabric- light in color and quilt it with vibrant colors. It looks like piecing but is amazing work!
This Patriotic one looks amazing from the front or back!
These other ones are just pretty to look at!
This one is a great kids blanket. It includes a list of things to find!
This last one is inspired by and features "Sister for Sale" by Shel Silverstein.
Here is my quilt....
Here is a picture of people admiring my quilt at the show...
I didn't win anything but it was definitely worth the experience. I had a blast and can't wait to go to my next one!!
~K
Monday, March 4, 2013
March Star
Here is the star for March!
I used some scraps I have of Frippery by Thomas Knauer. He does amazing work and I love his fabric lines. I am currently making a quilt with this fabric and love how it is coming along. Can't wait to share with you!!
I used some scraps I have of Frippery by Thomas Knauer. He does amazing work and I love his fabric lines. I am currently making a quilt with this fabric and love how it is coming along. Can't wait to share with you!!
.
I have also started a Facebook Page . Feel free to like me and see what I am working on!
Subscribe to:
Posts (Atom)


.JPG)