There is a small fee for the whole year, but let me tell you, it's worth it!! My problem was deciding what to use as a theme for the year. I went back and forth. Over the holidays I found a great sale and got some School Days Composition in slate and got a bunch with the thought of using this for my background.
I was leaning towards scrap busting but didn't want it to be too random. I finally decided that my 12-inch block for each month would feature scraps of some of my favorite collections that I have used/will use.
Here is my January block. It features Moda Marbles Warm which I am using for a quilt.
I love this! Some people aren't familiar with paper piecing and it is kind of hard to explain without something to physically show them, so I thought I would show you how I do it.
First of all, you have to print the pages. Not too hard. I chose to do the 12-inch blocks and her directions are to print 2 of each page.
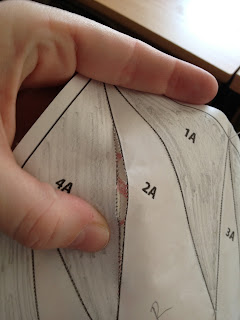
Here's a closer picture.
See the numbers and letters? The B represents the 2nd page (other one is A as you can see at the top) the numbers represent the order in which to sew the sections on and the thick black lines show you where to sew! Talk about a sew by number-follow-the-line easy goodness!!
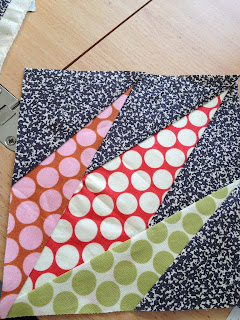
For this block I pulled out my bag of scraps from Amy Butlers Dots Collection. I used this to make Tula's Space Dust paper piecing pattern. I got out my handy mini iron and smoothed some strips that looked to be about the right size.
You can also see that I put the letters in each section for the different colors I am using so that I don't mix them up.
Now is the time to start sewing. Take piece 1, which is the background and place it on the side of the paper without the lines. I like to hold the paper and fabric up to the window to make sure it is lined up. I pin this piece in place so that it doesn't shift on me.
The next piece you will attach is piece 2. you need to lay the fabric/paper combo fabric side down (lines facing up). Fold the paper up along the line between sections 1 & 2. You should see the back of the fabric.
Place your ruler along the edge of the paper with 1/4 inch over hanging. You will trim along this line to give you a straight line to match up the fabric to and to guarantee that all seams are 1/4 inch.
Once this is done, flip it back over so that the fabric is right side up. Lay the fabric for section 2 RIGHT SIDES FACING (this is very important) and match up the edge of it with the edge you just cut. You can pin this if you want to.
Before you start sewing, you want to shorten your stitch length. Instead of the normal 2.5, I use 1.5. You will be thankful you did this when it is time tear the paper away.
Something else to remember is that sewing thru paper will really dull your needle and you won't want to use it on fabric again. If you are doing a bunch at one time, I would throw it away when you are done. If you will be going back and forth from fabric to paper. I would mark your paper needle so that you don't forget which one to use. When you sew this, you don't need to reverse stitch to seal your end and stop point. The tight stitches will help it stay together. Just drop your needle at the beginning of the dark line and stop when you get to the end of it. Pretty simple. There is a 1/4 inch seam allowance that is already accounted for on the edges of the paper (for attaching blocks together) it is ok to sew on this.
Once you have sewn that line take it off your machine and iron it open. Then repeat the same processes for each section.
Once sewn, along the seam that you just sewed, tear away the paper along the edge.
Iron the seam open.
Sew the other 2 blocks together, tear away paper, and press seam open. Match up seams on both sets and sew together.
Tear away paper from the seam and press either open or to a side.
Now its time for the fun part!! Start wherever you want and start tearing away the paper along each line.
Almost done!!
Press one more time and your 12.5 inch block is finished.
I just love the dots. Now it's time to think about what fabric to use for the next month.
Hopefully everything was clear as mud!! Let me know if you have any questions!
~Kim


No comments:
Post a Comment